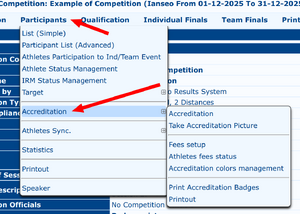
Participants/Accreditation
This page is in progress Please check back later for additional changes. |
Accreditation is an essential part of the pre-competition management: check-in, picture uptake, accreditation badge delivery, etc can be done from these pages.
The menu is divided into 3 main blocks: the first block deals with the actual accreditation desk operations, the middle block is the setup of fees in case billings are needed, including entries that have a free entrance, the third block are the printout parts: badges including badge creation and specific accreditation desk printouts.
Accreditation
- Session selection: no selection selects all sessions
- Accreditation option
- Based on the option selected some filters can apply
All pages "work" in the same way: a list of entries is presented, clicking on the Bib number a popup opens to manage that specific entry option. If the entry code is printed as a bar code on an accreditation card, a bar code reader can be used to scan the badge and confirm the operation.
At the top of the page a series of filters can be applied to select by name, country, category, etc.
Most of the features takes into account a bill system, provided it has been set correctly (see later)
Take Accreditation Picture
Not to be confused with the main item having the same title (see later). This page lists the entries that need a picture or already has one. Due to the browsers security concerns, this page is not maintained anymore and will probably be removed in a future release. USB Webcams or IPcameras can be used: check the Setup (in the title bar) and follow instructions.
If a webcam (external or internal) will be used, the most important step is installing VLC (Videolan) on the computer that will have the camera attached.
- internal webcam in linux is called /dev/video0 so default external webcam will be /dev/video1. Of course if the computer the webcam is atteched to has no internal webcam you need to adjust the command adding "/dev/video0" at the end, like in:
bash /...../VLC-Linux.sh /dev/video0
Payments
As for all other pages in this menu, the list shows the entries that are expected to pay.
Accreditation
This is the actual page to use to acknowledge entries that are actually there.
Equipment Inspection
This page helps judges during the equipment inspection procedure.
Take Accreditation Picture
Through this option, the user can manage the parameters needed for shooting pictures for athletes that don’t have one in the official database (see Figure 2.28). When an athlete doesn’t have a picture in the system, the program returns an error, highlighting the corresponding row, as shown in the following picture.
[NB: Figure 2.28: Taking Athletes Pictures and system errors (Missing Photo). !]
Fees setup
the payment page displays only two drop-down menus and a box, where the user can type the tournament fees for every division and class combination (see Figure 2.29). As for the previous screens, by pressing and holding CTRL, the user can select more items at the same time. Once the selection is complete, the user can upload the fees into the system by clicking on the ‘Save’ button.
[NB: Figure 2.29: Setting the tournament fees. !]
Athletes fees status
As it can be easily understood, through this option, the user can manage athletes that, for several reasons, won’t have to pay for participating in the tournament. Searching and selecting these athletes from the drop-down menu, in the Payment page, the user can choose if any archer will have to pay the tournament fees (‘Yes’), or not (‘No’; see Figure 2.30). If any archer won’t have to pay these fees, the user will be able to edit the archers details as any other one, during the Accreditation procedure, with the only difference that tournament revenues won’t be changed accordingly.
[NB: Figure 2.30: Setting Nonpaying Archers. !]
Accreditation colors management
This function enables the user to manage colors for Accreditation badges, depending on the access rights granted to different participants classes (see Figure 2.31).


